Tuesday, March 23, 2010

How to Make Bias Tape

Bias Tape can be used for a plethora of projects

from clothing to camera shoulder pads to binding on a quilt.Step 1: with a half yard of ironed fabricfold it in half on the bias (angle) and cut.
Step 2: Then cut 3" strips on the angle.

***Note: I used the first cut strip as a guide for the other strips.***Step 3: Sew ends together straight across. Then cut off (pointed) triangle ends.Step 4: Fold sewn strips in half and iron.
Step 5: Open up strip and then iron each

side down, meeting at the center fold.
Step 6: Fold in half and iron again.

Step 7: Add it to your sewing projects.

To add bias tape I open up the bias tape and place the right sides of my bias tape and touch the right side of my sewing projects edge. The fold nearest to the edge of my project and bias tape, I use as a sewing guide. I then sew the bias tape to my project, sewing on that fold in the bias tape. After that is done I wrap the rest of the bias tape around to the other side of my sewing project. ***I usually use bias tape as an edge binder to add a cute trim or cover up rough edges of a project. ***Sew your bias tape down on the other side. I follow as close as I can to the end of the fold (making sure I sew the back of the bias tape as well as the front. It can be a bit tricky at first but the more you do it the more familiar you will become with it.

Have Fun,

Be Creative,

Look Fantastic!

It's Your Time To Shine!!!

Monday, March 22, 2010

Up-Cycle Your Old Purse

My favorite purse was starting to look a little shabby around the straps. I love the color of this purse and did not want to search for a new one, all because of the straps. So I made covers to hide the straps but maintain the stiffness. To up-cycle your purse, all you have to do is measure the width and length of your straps. I added 1/2" to the width of my strap measurement for seem allowance and then doubled it. Then I cut out 2 strips of coordinating fabric, sewed the edges with right sides together and then turned the tube strap covers inside out.
I then pulled out the stitching of my purse straps (taking note of how it was sewn together) and slid the new covers over the old straps. My straps had a leather piece that covered the stitching on the end. I slipped that over the new straps and sewed it back on to the purse exactly like it had been sewed before I covered the straps and...Voila! New strap covers and a salvaged favorite purse!

Have Fun,

Be Creative,

Look Fantastic!

It's Your Time To Shine!!!

Monday, March 15, 2010

A Few Food Storage Tips


For the past few months I have been using and experimenting with my food storage and felt a strong need to share with you what I have learned. By adding just a few items that can be rotated (because they are used or can be used often in your normal everyday diet), your food storage will be more edible when you actually have to use it.

#1 Powdered milk is really nasty by itself and really REALLY changes the flavor of your recipes when you use it. So if you are making bread/cakes/etc that requires powdered milk I would substitute instant pudding mix. Also, evaporated milk does not work if you are trying to make instant pudding. It tastes bad and does not set (even when I opened the can and put it in another container and then chilled it in the fridge).

#2 If you want milk and have powdered milk then make sure you have plenty of hot coco mix (cocoa powder with sugar can work too) on hand to mix it with to make it more potable.

#3 Molasses for making brown sugar! For every 1 cup of granulated sugar add 1-2(for light -dark brown sugar) table spoons.

#4 Gum is easily consumed and rotatable. This adds variety and something sweet for the pallet.

#5 Canned tomatoes are used in a lot of recipes from soups-casseroles-chili-sauces. Make sure you have a lot of cans and rotate them.

#6 Canned fruit tastes good and kids will eat it. Mine like canned pineapples,peaches and pears the best.

#7 Marinades are great to have on hand for instant flavoring to meats.

#8 Favorite powdered juice mix because your stored water will be stagnant and even with bleach to kill the germs it's going to taste really bad! The soldiers in Afghanistan wanted juice mixes sent with their care packages because their water tasted really bad.

#9 Plenty of: Oatmeal, granulated sugar, flour and yeast (if you actually use it often, otherwise it's just going to go bad and you won't know how to use it anyway....so what I am trying to say is start making bread or rolls once a week or once a month to know how to use it and rotate it.)

Here is a great site I found while trying to look for food storage pictures .
I know it's a totally random post but I felt inspired to share a few things that I have learned about using my food storage. I hope this helps you think about your food storage and preparedness.

Thursday, March 11, 2010

Camera Strap Cover

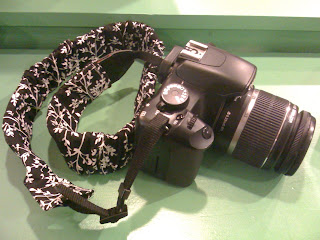
~A Strap Cover for your camera or video camera~
It's SEW Easy!!!
Step 1: Find the width of your camera strap and add 1/2". Then multiply it by 2. This will give you the width that you should cut your fabric. For the length I measured 1.5 times the length of my existing camera strap. After obtaining these measurements, cut your fabric to match.
Step 2: Fold each end of your fabric strip over twice towards the wrong side of fabric and sew down (as shown below). Then sew a 1-1.5" side of a Velcro strip to each side (as pictured). Then repeat on opposite end. *Note: I had 2 strips of fabric that I sewed together to give me the width I needed.***Step 3: Sew down the side to close the strap then turn inside out.Step 4: Remove your old straps from one side of your camera and slip the strap cover over your old strap. Re-attach the removed side and... done!***Note:
The strap on this picture was not pushed all the way past the leather end. It stayed in place so I didn't have to use the Velcro end.***
As always:
Have Fun,
Be Creative,
Look Fantastic!
It's Your Time to Shine!

Monday, February 22, 2010

Soft Moist Peanut Butter Cookies!!!

Are you looking for a peanut butter cookie that is moist and soft? I've got one for you! I was playing around with cookie recipes and swapped a couple ingredients out of my favorite chocolate chip recipe and voila! A new cookie recipe was born!
Ingredients:
1/2 C (aka 1 stick) room temp. butter
1 C peanut butter
1 1/3 C white sugar
2/3 C brown sugar
2 eggs
1 1/2 tsp. vanilla extract
1 tsp. salt
1 tsp. baking soda
2 2/3 C flour
2/3 C quick oats
Directions:
Pre-heat oven to 350 F. Cream butter, peanut butter and sugars til well blended. Add eggs and vanilla and mix well. Slowly add flour until well blended and then add oats til mixed. Place golf ball size dough balls on un-greased cookie sheet (I use an ice cream scooper for consistent sized cookies). Gently flatten balls like a hockey puck. Sprinkle a generous amount of white sugar on top of each cookie and then lightly press a fork over top of dough in a criss-cross pattern. Bake for 12 (13 minutes max). Let cool on cookie sheet for 5 minutes then place on a cooling rack.
Enjoy!

Monday, February 15, 2010

Comfort Chili

Here is one of my favorite winter comfort foods, chili. It's easy and hits the spot on cold days.
Comfort Chili
2 lbs Meat cut in 1" cubes (ground beef and chicken works too. I just love chunks of beef)
1 medium Yellow Onion chopped in small pieces
3 Stalks Celery chopped
1 C Carrots chopped (the chunkier the better)
1/4 tsp Salt
1/4 tsp Pepper
2 tsp Garlic Powder
1 1/2 Tbs Parsley
1/4 tsp Pico de Gallo
1/4 tsp Cayenne Pepper
1/2 tsp Chili Powder
Salsa 24 oz. (use 1/2 can for thicker chili)
Black Eyed Peas 15 oz. can
Black Beans 30 oz. can
Chili Beans in Chili Gravy 30 oz. can
Diced Tomatoes 30 oz. can
1 C Refried Beans (optional if you want thicker chili )***Add after chili has finished cooking and mix in hot chili until desired thickness***
Instructions: Place all ingredients in a crock pot and mix. Cook for 4-6 hours on medium/high. Serve hot right from the crock pot and top with cheese or sour cream! Enjoy!

Monday, February 8, 2010

Super Easy Boys Hair Cut

Step 1: With clippers set to S-3 (1/2" attachment) cut hair upwards (from bottom of hair to top) a little past where the head starts to curve (as pictured) and to about an inch above the eyebrows.Step 2: This part can be done by hand (see instructions by clicking here) or with a 3/4" and 1" attachment. The 3/4" attachment should be used to cut the uncut hair on top (starting from the back of the head to 3/4 to the front) and use the 1" for the rest of the 1/4 of front hair.
***Note: I prefer to hand cut because it gives me the ability to blend better and I can adjust how long I want it if it needs to be.***With this haircut you don't have to style it. My boys like the low-no maintenance style of it!

Thursday, January 28, 2010

Quick Valentines Cards

Feeling crafty but lack the time? Here's a quickie to scratch that craft itch!
All you need is:
Card
Ribbon scraps
Buttons
Charms or old jewelry pieces
Hot Glue GunGlue ribbon to secure on card. Add bows, yo-yo's, charms, buttons or whatever cute thing you have and glue away!
Your kids can get involved! Make your own Valentines cards and feel like a crafting queen!
Have Fun,
Be Creative,
Look Fantastic!
It's Your Time To Shine!!!

Wednesday, January 27, 2010

"Up-cycled" No-Sew Pillow Case #1

What You Need:
scissors
t-shirt (make sure it has elastic or Lycra)
masking tape
standard couch pillow
Step 1: Place masking tape under arm like picture. Step 2: Using masking tape as a guide, cut off top portion of t-shirt.Step 3: Cut 1" wide by 1.5" deep strips at the top of t-shirt and bottom. Your t-shirt has a top layer of fabric and a bottom. Double knot top strips to bottom strips to close one end.***note: the side seams on t-shirt is sewn shut already***When you make your strip and come to the side seams of your t-shirt, cut up 1.5"of side seam so you will be able to make a tie at the end. Step 4: Place pillow inside pillow case. Then tie and double knot top strips to bottom strips to close pillow!Done!
Have Fun,
Be Creative,
Look Fantastic!
It's Your Time To Shine!!!

Tuesday, January 26, 2010

Feather Headbands+Clips

Feathered hair accessories have been all the rage for the past few years.
Why not make your own and pay half the price! It's also really quick and easy to make!
All you need is:
individual feathers or feathers on a strip (found at craft stores and even Wal-mart)
E 6000 glue
clip/headband/Bobbie pin
coordinating threadFor Headbands and Hair Clips
Step 1: Cut feather strip to size of head band and glue to headband (I prefer the flat headbands but the thin rounded ones work as well). For a finished look glue and wrap gross grain ribbon over each end of head band (this is not necessary). Let dry and wear daily :)
For Bobbie Pin Feather Accessory:
Step 1:
Place a group or one large feather on a Bobbie pin and place a small amount of glue.
Step 2: Wrap coordinating thread around feather quill and secure with glue. Make sure to wrap thread around the flat side of Bobbie pin. Let dry and wear daily :)

Have Fun,

Be Creative,

Look Fantastic!

It's Your Time To Shine!!!

Monday, January 25, 2010

No-Sew Legwarmers

Are you in need of some cute fun legwarmers but don't want to spend a lot of time or money on them? Are you earth conscious and love to up-cycle your clothes?
Have I got the perfect project for you and all your friends to try!
Tie-It-Up!All you need is :
  • an old stretchy t-shirt with some elastic in it
  • masking tape (any tape will do)
  • and scissors!
Now let's Tie-It-Up!
Step 1: Place your masking tape along the sides of your "T", across the chest (the bottom of the neck is a good guide line to place it at, and finally down the middle (like pictured).
Step 2: Cut through both layers of your "T" using tape as your cutting guide.
Then cut it up the center tape guide (this will divide it into a left and right side).Step 3: Take both top and bottom layers of the left section of your "T" and cut each side (through both layers of fabric) about 1" width by 1.5" deep. Then double knot the top and bottom layers together (as pictured) on both sides! Repeat on the remaining pieces for a set of Rockin' legwarmers!!!***Note: Once you have made your double knots on both sides, gently stretch your knots like pictured.***
Done!!!As always:

Have Fun,
Be Creative,
Look Fantastic!
It's Your Time To Shine!!!